I have written many blog posts about the magic that can happen when you combine Google Tag Manager (GTM) and Google Analytics (GA4).
‘Magic’ is, just maybe, a bit hyperbolic but there is no doubt in my mind that some of the incredible frustrations that can occur when using GA4 can be massaged into the background when you start to enjoy the marriage of GTM and GA4, as they really do play nicely and it is great for us marketers not to have to rely on the techies to be able to start measuring the things that you need to be able to measure on a website.
Once you get your head around the principle of triggers and tags in GTM, you can start to get creative about how you track particular user interactions. There are plenty of ‘out of the box’ options in GTM and they often do the job, but there are also occasions when they do not offer *exactly* what you need or they just don’t work, due to some technical peculiarities on your site.
I wanted to share a particular example of things not working and discuss the potential challenge of using ‘generate_lead’ for form tracking if you have multiple forms in order to, hopefully, help give you some alternatives if you are struggling to make the magic work.
The test case
To demonstrate some specific examples of how to track multiple forms, I will use a website that I built for a stunning holiday let in Newport, Pembrokeshire. I should declare an interest, as we own the property, but it is the perfect site to share some common problems that you may face when trying to track forms.
The main objective of the website is ultimately to steer users towards the booking engine but we also have two different forms on the site:
- a general contact form, which is on the contact page
- an email newsletter sign up, which is in the footer on EVERY page
There is nothing especially challenging with this, but it does introduce some interesting questions about how to differentiate between the forms, especially if they are actually on the same page, as they are on the contact page.
All about ‘generate_lead’
Before we continue, I need to introduce the concept of GA4’s ‘recommended events’.
The easiest way to track these two forms separately would be to create unique events for each form. E.g. the contact form could trigger an event such as ‘contact_form_submission’, whilst the newsletter sign up form could trigger a ‘newsletter_signup’ event. One of the strengths of GA4 is that it is very flexible and there is nothing stopping you using any naming convention that you choose. By using different event names, it will be incredibly easy to see how many times each form was submitted, simply by looking for the event name in GA4 event reports.
Whilst that would indeed be easy, you *should* really be using GA4 recommended events wherever possible. Whilst there is certainly no obligation to do so, the following sentence should be noted in their official documentation:
You should send recommended events with their prescribed parameters to get the most details in your reports and to benefit from future features and integrations as they become available.
Whilst I have personally not seen any evidence that these ‘future features and integrations’ have materialised, I do think that it is good practice to future proof your reporting. In essence, using ‘generate_lead’ as the event name will ensure that GA4 understands that the event relates to a form submission or requests further information. i.e. a very positive signal.
Yes, ‘contact_form_submission’ may be much more meaningful to you and me, but it is just a meaningless label to GA4, whereas ‘generate_lead’ carries extra weighting and may help other platforms interpret the actual value of events. This could be especially relevant to Google Ads, for example, and I believe that it is definitely important to help Google Ads recognise the difference between a ‘purchase’ event and a ‘generate_lead’ event.
As always, my view is that you should not assume that any computer is actually clever and to help them, as much as possible, to understand the data that you are giving them. For that reason, I always choose to use the ‘generate_lead’ event for all forms.
It does, however, make it harder to differentiate the data in your GA4 reports, as every form submission will be lumped together in the ‘generate_lead’ event count. That becomes irritating if I want a quick snapshot of how many contact forms and how many newsletter sign ups there have been on the Peg-y-Don website.
How to record a form submission in GA4
Out of the box
There are three very easy ways to track a form submission using the GTM / GA4 platforms:
- Track button clicks on a submission button (very easy, but not advisable as you are very likely to see inflated numbers as you are not considering any form validation)
- Track page views of a thank you page (this does work, but a lot of forms will not actually redirect to a thank you page, in which case it simply won’t work)
- Use GTM’s inbuilt ‘Form Submission’ trigger (see below…)
I don’t want to lengthen this blog any further with a step by step guide to using triggers and events in GTM, but the basic principle is that you identify a trigger than can be used to indicate that something has happened and use that trigger to fire a tag. In this case, we are going to use that tag to send an event to GA4.
As noted above, GTM has an inbuilt ‘Form Submission’ trigger, which is arguably the easiest way to handle forms as it should just work. Here is a possible configuration of this trigger if I wanted to use it for tracking the contact form on the Peg-y-Don website:

I would always recommend selecting the ‘check validation’ option when using this trigger as it will only fire if the form submission is actually successful. In other words, you will overcome the very likely inflation of form submissions that you would expect from tracking clicks on a submit button.
There is a small catch with this option, in as much as you need to add a condition for the trigger if you choose to check validation. In this particular example, I can narrow down on the contact form by stipulating that the page path has to contain /contact/ as that is the only page that features the general contact form.
If I configured the trigger for the newsletter sign up (which is on every page of the website) in this way, it would only actually fire on the contact page. You can overcome this by using ‘/’ as the page path, but you will be targeting all forms on all pages, so you should then definitely select the ‘Some Forms’ option radio button and then specify the form(s) that you wish to target using the trigger.
Using the inbuilt trigger is always my starting point and it generally does work. But life isn’t always that easy…
Element Visibility Trigger
For reasons not immediately clear to me, the standard GTM form submission trigger simply does not work on the Peg-y-Don site if I select the ‘check validation’ option. I haven’t had the time to debug properly, but it seems to trip over some odd regex problem. Neither form redirects to a thank you page and I simply don’t want to rely on button clicks, so I had to think about other options.
Whilst we do not use a thank you page, a thank you message is displayed after successfully submitting a form. Whilst the URL does not change, some new text is introduced on the same page to confirm to the user that their form has been submitted. This is where the GTM magic can help, as there is another inbuilt trigger called ‘Element Visibility’.
In simple terms, the Element Visibility trigger fires when something becomes visible on the page. It is fairly powerful and can therefore be a little complicated to set up properly. There are various ways to configure it, but I will share how I use it for the general contact form and hopefully steer you in the right direction.
As with all things GTM related, you need to find something that is unique to use as the foundation of a trigger. In this case, I chose to target the thank you message that is displayed once the form has been successfully submitted. Again, there are a few options that you can use but my preferred strategy is to look for a CSS class as I have found this to be the most reliable. Thankfully, the thank you message that replaces the actual contact form is wrapped in a handy .kb-adv-form-success class. This class is only used for the thank you message, so it serves very well as a basis for the trigger.
The following screen shot shows the configuration that I use for the contact form trigger:

I am not 100% convinced about the ‘Minimum Percent Visible’ setting, but the theory is that you can specify how much of an element needs to be visible before firing the trigger. I have it set at 1 simply to avoid any possible reason for it not to be fired.
I have tested the ‘Observe DOM changes’ option on a number of sites and do find that it helps increase the accuracy of the trigger, but it is worth testing both options. There are few instances that I can think of where stipulating a minimum screen duration is beneficial, so I have ignored that.
Event Tag
Still with me? I hope that makes sense on the trigger front, but you now need to create a tag to send events to GA4. Although I am actually tracking two different forms here, I can use the following tag for both forms:
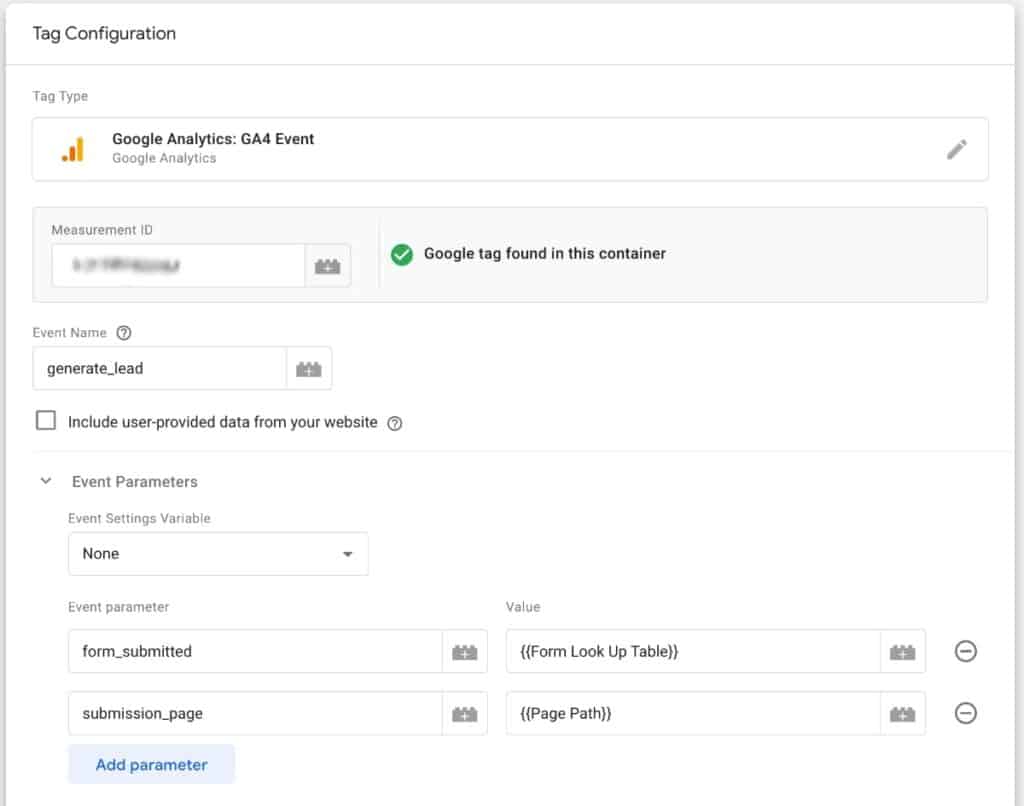
As you can see, I am sending a ‘generate_lead’ event, as explained above. Where it gets more interesting is the additional event parameters, which we will use to help differentiate between the forms in GA4 reports. Remember, we want to be able to see how each form performs in GA4 reports, which will not happen without adding some extra information to the event.
Parameters are exactly that – extra titbits of data that enrich the event data that you send. In this case, I am using two parameters:
1] form_submitted
This parameter sends a label for the form that was submitted. I would normally simply look for a form_id attribute when using the inbuilt form submission trigger, but this does not work in this case as I am using the element visibility trigger. There is a workaround that is based on using a variable known as a ‘Lookup Table’. It looks a bit daunting, but it is easy to do. Simply go to ‘Variables’ in GTM and add a new one, selecting the ‘Lookup Table’ option. You then configure it to suit your needs.
For these forms, the following was used:
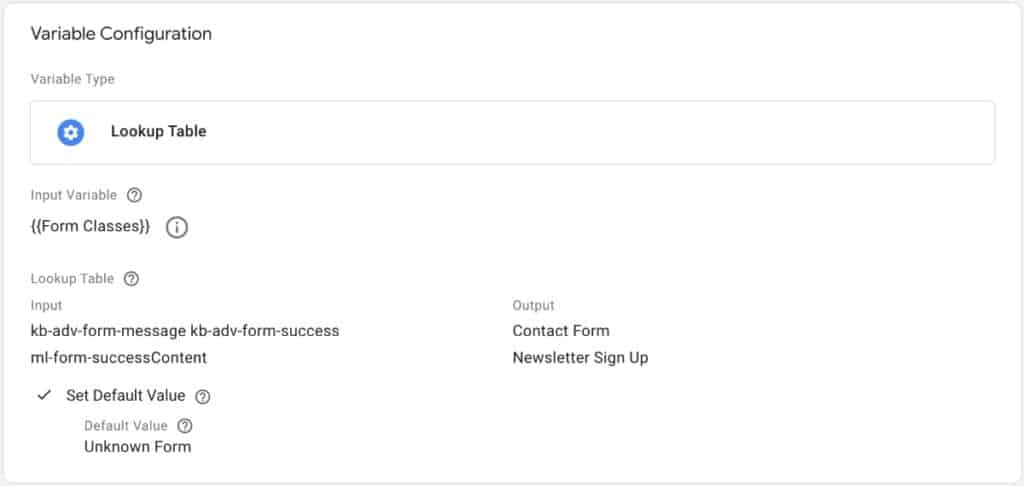
What this does is replace the very unhelpful form class with something more meaningful. I hope you agree that ‘Contact Form’ and ‘Newsletter Sign Up’ are much more useful labels to use than ‘kb-adv-form-message kb-adv-form-success’?
2] submission_page
I should start by making it clear that this parameter is not actually needed, as page_location is automatically sent with any event since it falls under the GA4 automatically collected events. I actually set it up for some internal GA4 training here at Browser Media towers, so I thought that I would include it in this post as I hope it helps serve as another example of how you can configure GTM and GA4 to help understand what is happening on your site.
The objective here is to understand where people are submitting the newsletter sign up form. As that form is on every page of the website, I wanted to be able to quickly see which content is the most successful at encouraging sign ups. Whilst that data is actually readily available by drilling into the standard event parameters, I wanted to make it super easy to see alongside the ‘generate_lead’ event data. For this post, I really just want to focus on how to differentiate between the two forms, despite using the same event name.
Where can I see the data in GA4?
Assuming that the trigger is firing as planned, you can simply log in to GA4, navigate to the ‘events’ report and look out for ‘generate_lead’ in the event name column. You will then see an event count, which tells you how many times the tag has fired, as well as other data such as the number of users (this should normally be very close to the number of events, unless there is a good reason why one individual may submit multiple forms – e.g. me testing that the form tracking is working…).
That is a good start, but it is also where GA4 starts to get frustrating. You can click on the ‘generate_lead’ link in the event name column and I would suggest that it is natural to expect to see more information about that specific event. Unfortunately, the default information presented is, in my humble opinion, a bit lacking and you can only see the event parameter details that we set up above in the ‘Events in the last 30 minutes’ card.
Thankfully, there is a way around this, but it is more complicated than it should be.
You need to head to the admin section of your GA4 account and select the ‘Custom definitions’ link:

This will show you any custom dimensions that you have already created, but the chances are that there will be an empty list and you need to click on the blue ‘Create custom dimension’ link in the top right hand corner. This then pops up a form that allows you to configure a new custom dimension.
The name is entirely up to you, but will be used in the GA4 cards that we want to create, so it is worth thinking about. As I want to create a quick snapshot of the totals for each form submitted, I chose the name ‘Which form was submitted’ as you can see in the screenshot below:
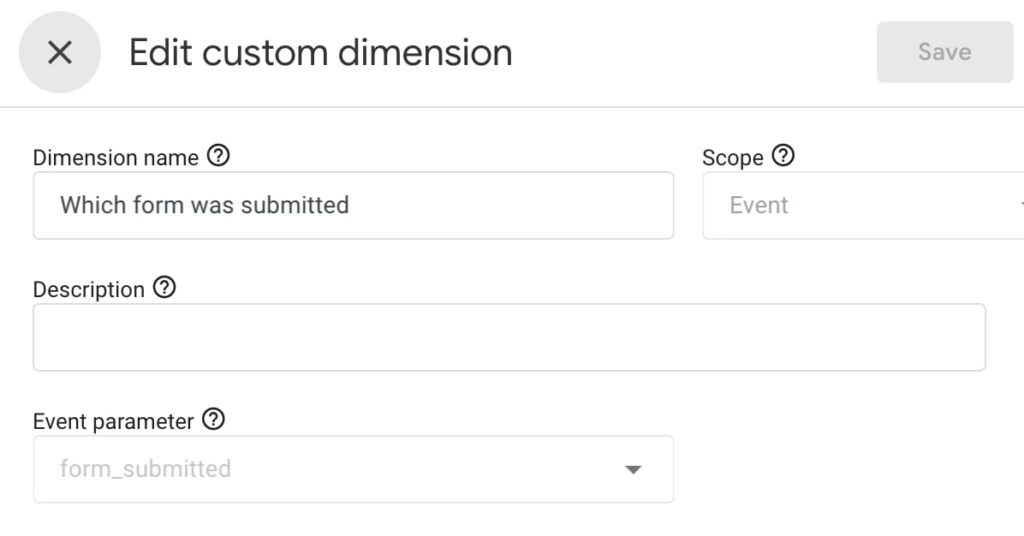
As we are creating a custom dimension that relates to an event, you can leave the ‘Scope’ drop down as ‘Event’, which should be the default. The description field is optional, but you then need to be careful with the ‘Event parameter’ field, which must match exactly the name of the parameter that you wish to pull into the GA4 report. If the event has already fired, you should see it in the drop down, but my advice would be to copy and paste it from the event tag that you created in the Tag Configuration screen above if it is not listed in the drop down options. It is very important that it is an exact match, as it simply will not work as you want it to if you miss type anything.
Having done this, I am afraid that you will experience yet another GA4 frustration and probably will not see anything different in your reports for around 48hrs. It is infuriating, but I am afraid that is the way that it is. Please don’t shoot the messenger!
Once the data is working as it should, you will be able to see an additional card in the report when you click on the ‘generate_lead’ event, as shown below:
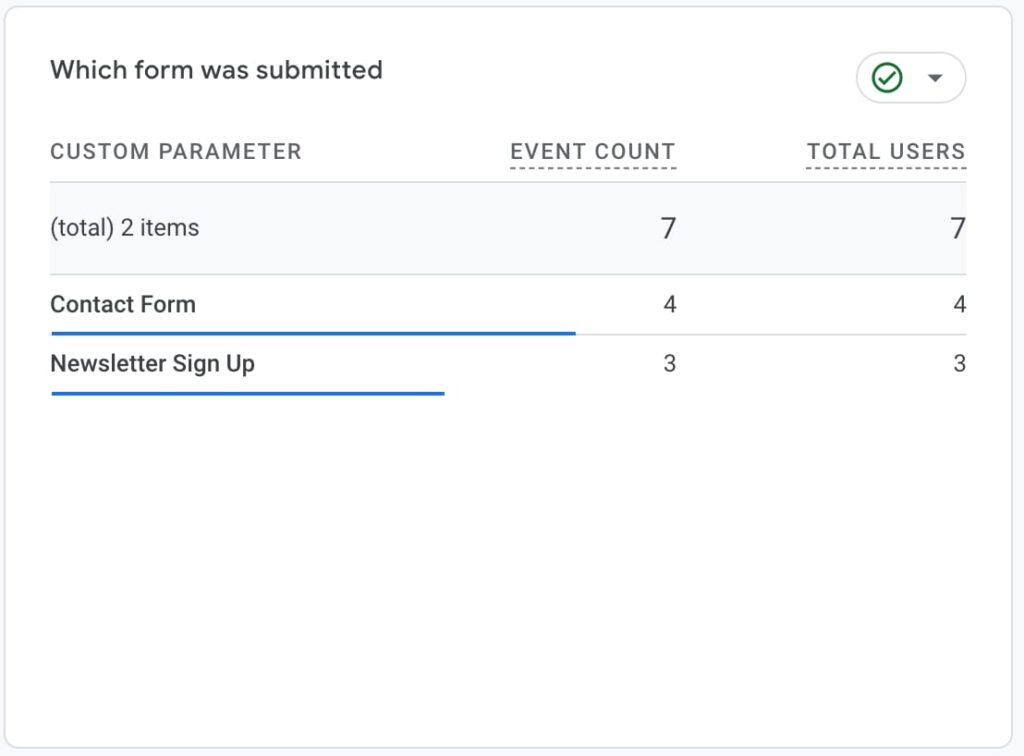
Boom – there you have it. A quick snapshot of the number of times each form was submitted in your selected timeframe, all whilst adhering to the recommended use of the ‘generate_lead’ event.
You can of course use the parameter data that you send in other reports, including explorations, but I hope that this simple card, using the custom dimension is relatively easy to set up and helps give you the extra information that you may want to see for specific events. This same approach can be used to bring some of the (useful) data that is typically buried in GA4 to the surface and it can greatly reduce the frustration that I am sure we all feel at times when using GA4…
If you are still struggling with all things GA4, book yourself a break in the heavenly Pembrokeshire coast and contact us so that we can help 🙂